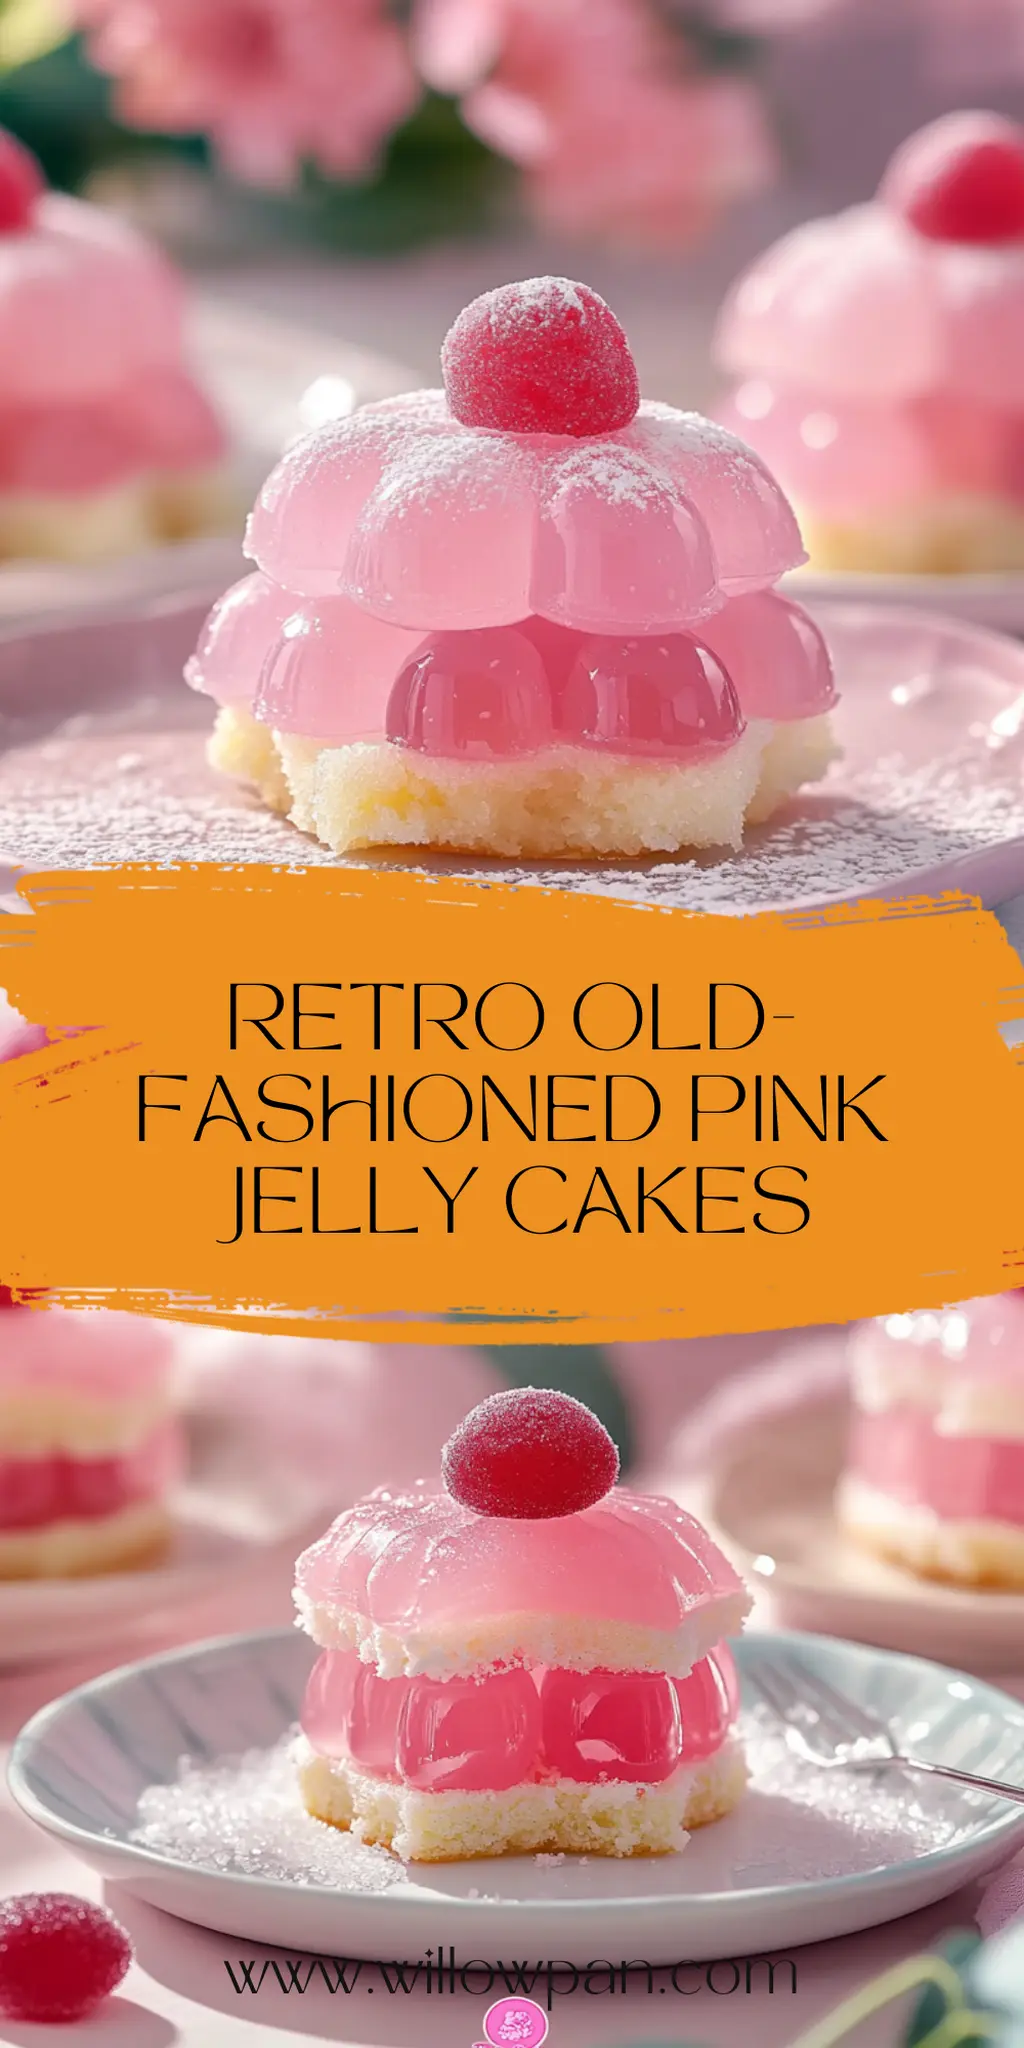
There’s a certain nostalgia that wraps around me like a warm hug when I think of Retro Old-Fashioned Pink Jelly Cakes. These delightful treats remind me of carefree childhood afternoons, where my biggest decision was how many squares to sneak from the plate. With their bright pink hue and fluffy texture, they always seemed to bring a smile, not just to my face but to everyone around me.

I stumbled upon this treasured recipe one rainy Sunday while rummaging through my old cookbooks, each page a window to simpler times. The best part? It’s surprisingly easy to whip up, making it the perfect choice for impressing guests or simply indulging in a sweet craving without the fuss that often accompanies baking.
Picture this: light sponge infused with strawberry flavor, topped with whipped cream and a sprinkle of coconut—the combination is as elegant as it is comforting. Join me in recreating this classic dessert that not only tastes wonderful but also brings back that joyful, vintage charm. Let’s make some memories, one slice at a time!
Why You'll Love This Retro Old-Fashioned Pink Jelly Cakes
- These Retro Old-Fashioned Pink Jelly Cakes are incredibly easy to make, allowing you to enjoy the delightful baking experience without any hassle.
- Bursting with a nostalgic strawberry flavor, this dessert is sure to transport you back to carefree childhood days with every bite.
- The vibrant pink hue and beautiful coconut topping make these cakes a stunning centerpiece for any gathering, impressing your guests with both taste and presentation.
- Plus, with a quick prep and bake time, you can whip up this crowd-pleaser in no time, making it the perfect treat for any occasion.
Retro Old-Fashioned Pink Jelly Cakes Ingredients
Here’s what you’ll need to bring these nostalgic treats to life!
For the Cake Batter
- Butter – 80 g, softened – Choose unsalted butter for a perfectly balanced sweetness.
- Caster Sugar – 110 g – Using superfine sugar helps achieve a light and fluffy texture.
- Vanilla Extract – 1 tsp – This adds a lovely warmth to complement the strawberry flavor.
- Egg – 1 large – A room-temperature egg helps bind the ingredients together smoothly.
- Milk – 160 g (2/3 cup) – Opt for whole milk for an extra creamy richness.
- Self-Raising Flour – 130 g, sifted – This ensures a light and airy cake, perfect for our Retro Old-Fashioned Pink Jelly Cakes.
For the Jelly Mixture
- Strawberry Jelly Crystals – 85 g (packet) – This is the secret to infusing that iconic strawberry flavor into our cakes.
- Boiling Water – 240 g (1 cup) – Use the boiling water to fully dissolve the jelly crystals for a smooth consistency.
- Cold Water – 240 g (1 cup) – Adding cold water helps cool the mixture for easier incorporation into the batter.
For Topping
- Desiccated Coconut – 280 g (3 1/2 cups) – This adds a delightful texture and visual appeal to your cakes.
- Whipped Cream – 240 g (1 cup) – Lighten it up by using homemade whipped cream for a touch of elegance.
Now that you have all your ingredients, get ready to dive into the delightful world of Retro Old-Fashioned Pink Jelly Cakes!
How to Make Retro Old-Fashioned Pink Jelly Cakes
-
Preheat your oven to 350°F (175°C) and prepare a baking tray by lightly greasing it or lining it with parchment paper. This step ensures your cakes come out easily and maintain their beautiful shapes.
-
Beat together the softened butter and caster sugar in a mixing bowl until creamy and light in color. This should take about 2-3 minutes, and the mixture should have a smooth, fluffy texture.
-
Add the vanilla extract and the large egg, mixing well until fully combined. Be sure to scrape down the sides of the bowl to incorporate all ingredients into the batter.
-
Gradually mix in the milk, ensuring you pour it in slowly while continuing to stir. This will help create a consistent batter that isn’t too runny.
-
Fold in the sifted self-raising flour until just combined. Be gentle to maintain the lightness of the mixture, then set the batter aside for later use.
-
Dissolve the strawberry jelly crystals in a separate bowl with boiling water, stirring until fully melted. After that, add the cold water to cool the mixture down for easier incorporation.
-
Combine the jelly mixture with the cake batter, carefully mixing until everything is blended. The batter should now have a lovely pink hue, reminiscent of classic jelly cakes!
-
Pour the batter into the prepared tray and bake for about 18 minutes, or until the cakes have risen and are set in the middle. A toothpick inserted in the center should come out clean.
-
Cool the cakes in the tray for a few minutes, then transfer them to a wire rack. Once completely cooled, cut them into your desired shapes.
-
Serve each piece topped with a generous dollop of whipped cream and a sprinkle of desiccated coconut for that festive touch!
Optional: Add a few fresh strawberries on top for an extra pop of color and flavor.
Exact quantities are listed in the recipe card below.
What to Serve with Retro Old-Fashioned Pink Jelly Cakes?
Elevate your dessert experience by pairing these delightful treats with complementary flavors and textures that will enchant your taste buds.
-
Fresh Strawberries: Their natural sweetness and tartness provide a refreshing contrast to the soft, fluffy cake. A few berries can brighten up the plate while adding a burst of freshness.
-
Creamy Vanilla Ice Cream: Serve alongside a scoop for a luscious combination. The cold, creamy ice cream harmonizes beautifully with the pink jelly cake, creating a delightful mouthfeel.
-
Coconut Macaroons: These chewy, sweet morsels amplify the coconut topping of the cakes. The added texture creates an inviting contrast that will have everyone coming back for more.
-
Sparkling Lemonade: A crisp, citrusy drink that cleanses the palate. The light, bubbly nature complements the retro charm of the cakes, making your dessert table feel festive.
-
Chocolate Drizzle: A rich, smooth chocolate sauce to drizzle on top can elevate the presentation and add a decadent touch. This contrast will surprise and please the chocolate lovers among your guests.
-
Whipped Cream and Toasted Almonds: Add a dollop of freshly whipped cream topped with toasted almonds for an elegant touch. The crunch of the almonds rounds out the soft cake nicely.
-
Iced Tea with Mint: A refreshing beverage that balances sweetness with the herbaceous notes of mint. This drink not only complements but also uplifts the nostalgic vibes of your dessert setting.
Pair these delightful options with your Retro Old-Fashioned Pink Jelly Cakes for a memorable dessert experience that will charm friends and family alike!
Retro Old-Fashioned Pink Jelly Cakes Variations
Feel free to put your own spin on these delightful treats and make them uniquely yours!
-
Gluten-Free: Substitute self-raising flour with a gluten-free blend for a friendly option that everyone can enjoy. Make sure your jelly crystals are gluten-free too!
-
Flavor Twist: Replace strawberry jelly with raspberry or cherry for a vibrant new taste. The tartness of these fruits can add a refreshing zing to your cakes.
-
Coconut-Free: If coconut isn’t your thing, try rolling your cakes in crushed nuts or sprinkles for a crunchy texture and pop of color. This adds a lovely surprise in every bite!
-
Reduced Sugar: Cut down on sugar by using a sugar substitute like erythritol. This is perfect for a lighter treat without losing that charming sweetness!
-
Dairy-Free: Use a plant-based butter and almond or oat milk for a dairy-free version. The consistency may vary slightly, but the flavor will still be inviting and delicious.
-
Extra Creamy: Add an extra layer of texture by mixing cream cheese into the whipped cream. This will create a lush topping that enhances the nostalgic flavor.
-
Chocolate Drizzle: Melt dark or white chocolate to drizzle over the whipped cream for a luxurious finishing touch. Who doesn’t love a little added sweetness and decadence?
-
Spiced Up: Add a pinch of cinnamon or nutmeg into the batter for a warm spice note that complements the fruity flavor beautifully. This small addition will elevate your cakes with a cozy aroma.
Now, let’s dive in and start crafting your personalized Retro Old-Fashioned Pink Jelly Cakes!
How to Store and Freeze Retro Old-Fashioned Pink Jelly Cakes
Room Temperature: Store the cakes in an airtight container for up to 3 days to keep them fresh and soft. They are best enjoyed on the day they’re made.
Fridge: For longer preservation, place the cakes in the fridge in a sealed container for up to 5 days. Allow to come to room temperature before serving for the best taste experience.
Freezer: You can freeze the pink jelly cakes for up to 3 months. Wrap each piece tightly in plastic wrap and then place in a freezer-safe bag to avoid freezer burn.
Reheating: To enjoy your Retro Old-Fashioned Pink Jelly Cakes after freezing, simply thaw overnight in the fridge and let them sit at room temperature for 30 minutes before serving, or enjoy slightly chilled.
Make Ahead Options
These Retro Old-Fashioned Pink Jelly Cakes are perfect for meal prep, allowing busy home cooks to enjoy delicious treats with minimal fuss later on! You can prepare the cake batter up to 24 hours in advance; simply mix it and store it in an airtight container in the refrigerator. For even easier planning, consider baking the cakes up to 3 days ahead and keeping them in an airtight container at room temperature to maintain their moistness. When you’re ready to serve, cut the cakes into your desired shapes, top them with whipped cream and desiccated coconut, and you’ll have a delightful dessert that’s just as fresh and inviting as the day you made it!
Chef's Helpful Tips
- When making Retro Old-Fashioned Pink Jelly Cakes, ensure that your butter is truly softened for maximum creaminess, as this will help achieve a light and airy batter.
- Avoid over-mixing the cake batter after the flour is added, as this can lead to a dense texture rather than the fluffy cake you’re aiming for.
- Be careful when dissolving the jelly crystals; they need to be fully melted in the boiling water before adding cold water to ensure a smooth mixture.
- Remember to check your cakes a minute or two before the recommended baking time, as oven temperatures can vary and it’s best to avoid overbaking.
Retro Old-Fashioned Pink Jelly Cakes Recipe FAQs
What is the best way to choose ripe strawberries for this recipe?
Absolutely! When selecting strawberries, look for berries that are bright red, firm, and free of dark spots. Avoid any that are soft or have mushy areas, as these may be overripe and less flavorful. Fresh strawberries will elevate the taste of your Retro Old-Fashioned Pink Jelly Cakes beautifully!
How long can I store Retro Old-Fashioned Pink Jelly Cakes in the fridge?
You can keep your Retro Old-Fashioned Pink Jelly Cakes in the fridge in a sealed container for up to 5 days. Just be sure to allow them to come to room temperature before serving for the best flavor and texture. This way, they can maintain their delightful softness and taste!
Can I freeze the Retro Old-Fashioned Pink Jelly Cakes? If so, how?
Yes, you can absolutely freeze these cakes! To do so, wrap each individual piece tightly in plastic wrap, then place them in a freezer-safe bag to prevent freezer burn. They can be stored for up to 3 months. When you’re ready to enjoy, simply thaw them overnight in the fridge and let them sit at room temperature for about 30 minutes before serving. This will restore their delightful texture!
What should I do if my cake doesn’t rise properly?
Very! If your Retro Old-Fashioned Pink Jelly Cakes don’t rise as expected, it could be due to a few factors. First, ensure that your self-raising flour is fresh, as expired flour can result in poor rising. Secondly, do not over-mix the batter after adding the flour, as this can lead to dense cakes. Finally, check your oven temperature with an oven thermometer to ensure it’s accurate; a cooler oven can also cause cakes to form poorly.
Are these cakes safe for pets to eat?
It’s recommended to keep these Retro Old-Fashioned Pink Jelly Cakes away from pets, especially due to the presence of sugar and whipped cream. Cats and dogs can have sensitive stomachs with dairy ingredients. If you’re looking for a pet-friendly treat, consider making a plain cake without sugar or cream that is suitable for their dietary needs instead.
Retro Old-Fashioned Pink Jelly Cakes
Ingredients
Equipment
Method
- Preheat your oven to 350°F (175°C) and prepare a baking tray by lightly greasing it or lining it with parchment paper.
- Beat together the softened butter and caster sugar in a mixing bowl until creamy and light in color.
- Add the vanilla extract and the large egg, mixing well until fully combined.
- Gradually mix in the milk, ensuring you pour it in slowly while continuing to stir.
- Fold in the sifted self-raising flour until just combined.
- Dissolve the strawberry jelly crystals in a separate bowl with boiling water, stirring until fully melted.
- Combine the jelly mixture with the cake batter, carefully mixing until everything is blended.
- Pour the batter into the prepared tray and bake for about 18 minutes.
- Cool the cakes in the tray for a few minutes, then transfer them to a wire rack.
- Serve each piece topped with whipped cream and a sprinkle of desiccated coconut.